Optimized Metaballs: Blur Pass with Scriptable Renderer Features
bronson
- posted on
- 12 Comments
This article completes my approach to drawing pseudo-Metaballs in an optimized way using Unity, the Universal Render Pipeline (URP) and Scriptable Renderer Features. In the previous article, we covered the basics of Scriptable Renderer Features by drawing meshes to a custom render target. In this article, I cover the blur pass, our “step and clip” shader and finally drawing our RenderTexture back to the screen.
If you need a refresher, you can read the previous article here. The approach is to draw some objects to a custom render texture, blur them, apply a Smoothstep function and draw them back to the screen. Then, we call the result a pseudo-Metaball and pat ourselves on the back for doing a great job. If you’re looking for “real” Metaballs, check out this other series I wrote.
Structure of a Blur Pass
Before we start, I’m going to explain the basic structure of a blur. Blurring is a topic in and of itself. However, it’s often performed by examining an image’s pixels and averaging the colour with those around it. The more repetitions you complete, the blurrier the image becomes. This operation sounds straightforward, but there are several ways you can do this, each with its name and resulting look. In our case, we use a Kawase Blur. Why this type of blur? First, it’s relatively cheap to perform. Second, there was an example of a Kawase Blur in the URP examples Github repository, so it’s less work. I’ve linked an article about the Kawase Blur later in this post if you’re interested in learning more.
So let’s get started!
Kawase Blur Renderer Feature
As I mentioned, there’s an example Kawase Blur available in the URP Rendering examples repository. We’ll use this as our starting point. The plan is to keep the blur as a separate ScriptableRenderPass and enqueue it after our RenderObjectsPass. Then we’ll modify the blur pass to read from the RenderTexture created in the RenderObjectsPass and finally output the result to the screen with a custom material.
So our blur needs to know:
- The
RenderTextureto read - How many blur passes to execute
- What material to use to perform the blur
- What material to use to blit back to the screen
Additionally, the sample blur can perform a downsample. By the way, downsampling means crushing a larger image into a smaller image. Downsampling serves two purposes: it’s a cheap way to blur, and it makes the subsequent blur passes more efficient because there are fewer pixels to blur. So we’ll expose all these values in the Inspector and set them in the Scriptable Renderer Feature’s Create method. The complete Create method looks like this:
RenderObjectsPass _renderObjectsPass;
KawaseBlurRenderPass _blurPass;

const string PassTag = "RenderObjectsCustomRenderTarget";
[SerializeField] string _renderTargetId;
[SerializeField] LayerMask _layerMask;
[SerializeField] Material _blurMaterial;
[SerializeField] Material _blitMaterial;
[SerializeField, Range(1, 16)] int _blurPasses = 1;

public override void Create()
{
    int renderTargetId = Shader.PropertyToID(_renderTargetId);
    _renderObjectsPass = new RenderObjectsPass(PassTag, renderTargetId, _layerMask);

    _blurPass = new KawaseBlurRenderPass("KawaseBlur", renderTargetId)
    {
        Downsample = 1,
        Passes = _blurPasses,
        BlitMaterial = _blitMaterial,
        BlurMaterial = _blurMaterial
    };
}
```
You can see the Inspector properties in there as well. We also modify the AddRenderPasses method to add our blur pass:

```
public override void AddRenderPasses(ScriptableRenderer renderer, ref RenderingData renderingData)
{
    renderer.EnqueuePass(_renderObjectsPass);
    renderer.EnqueuePass(_blurPass);
}
Now that our Scriptable Renderer Feature is complete, we’ll work on the KawaseBlurRenderPass.
Kawase Blur Render Pass
So as previously mentioned, I used the example Kawase Blur as a starting point. I copied the class into my file and modified it to suit our needs. Let’s start with the constructor. We’ll receive and store the id of our source RenderTexture. Then, in the OnCameraSetup method, we’ll use that to get a RenderTargetIdentifier. Together that looks like this:
readonly int _blurSourceId;
RenderTargetIdentifier _blurSourceIdentifier;

readonly ProfilingSampler _profilingSampler;

public KawaseBlurRenderPass(string profilerTag, int blurSourceId)
{
    _profilingSampler = new ProfilingSampler(profilerTag);
    _blurSourceId = blurSourceId;
}

public override void OnCameraSetup(CommandBuffer cmd, ref RenderingData renderingData)
{
    _blurSourceIdentifier = new RenderTargetIdentifier(_blurSourceId);
}
Next, in the Configure method, we’ll request two RenderTextures. To perform the blur, we render back and forth between two RenderTextures, blurring with each iteration. Hence the two RenderTextures. We also have the option of downsampling our RenderTextures, that is to say, requesting RTs that are smaller than our screen resolution. I chose not to downsample, but the choice is there if you need it. So our Configure method looks like this:
public override void Configure(CommandBuffer cmd, RenderTextureDescriptor cameraTextureDescriptor)
{
    var width = cameraTextureDescriptor.width / Downsample;
    var height = cameraTextureDescriptor.height / Downsample;

    _tmpId1 = Shader.PropertyToID("tmpBlurRT1");
    _tmpId2 = Shader.PropertyToID("tmpBlurRT2");
    cmd.GetTemporaryRT(_tmpId1, width, height, 0, FilterMode.Bilinear, RenderTextureFormat.ARGB32);
    cmd.GetTemporaryRT(_tmpId2, width, height, 0, FilterMode.Bilinear, RenderTextureFormat.ARGB32);

    _tmpRT1 = new RenderTargetIdentifier(_tmpId1);
    _tmpRT2 = new RenderTargetIdentifier(_tmpId2);

    ConfigureTarget(_tmpRT1);
    ConfigureTarget(_tmpRT2);
}
So now we’re left with the Execute method. This method is straightforward. We blit our source RenderTexture into one of our blurring RenderTextures. Then, we ping pong back and forth between our two RenderTextures for the number of passes we specified. Then, we draw it back to the camera’s render target. By the way, the original example blur allowed the user to choose whether or not it should draw the result to the camera’s render target, but I removed that option. So this is how the complete method looks:
public override void Execute(ScriptableRenderContext context, ref RenderingData renderingData)
{
    RenderTextureDescriptor opaqueDesc = renderingData.cameraData.cameraTargetDescriptor;
    opaqueDesc.depthBufferBits = 0;

    CommandBuffer cmd = CommandBufferPool.Get();
    using (new ProfilingScope(cmd, _profilingSampler))
    {
        // first pass
        cmd.SetGlobalFloat("_offset", 1.5f);
        cmd.Blit(_blurSourceIdentifier, _tmpRT1, BlurMaterial);

        for (var i = 1; i < Passes - 1; i++)
        {
            cmd.SetGlobalFloat("_offset", 0.5f + i);
            cmd.Blit(_tmpRT1, _tmpRT2, BlurMaterial);

            // pingpong
            var rttmp = _tmpRT1;
            _tmpRT1 = _tmpRT2;
            _tmpRT2 = rttmp;
        }

        // final pass
        cmd.SetGlobalFloat("_offset", 0.5f + Passes - 1f);
        cmd.Blit(_tmpRT1, renderingData.cameraData.renderer.cameraColorTarget, BlitMaterial);
    }

    context.ExecuteCommandBuffer(cmd);
    cmd.Clear();

    CommandBufferPool.Release(cmd);
}
All that’s left now is to talk about the blur shader and the final “step and clip” shader.
Blur Shader
The blur shader is nearly identical to the one from the example. The only modification is I chose to blur the alpha values as well as the colour values. If you want to learn more about how the Kawase blur works, I linked a detailed article further down. So with that, this is the final frag function in the blur shader:
fixed4 frag (v2f input) : SV_Target
{
    float2 res = _MainTex_TexelSize.xy;
    float i = _offset;

    fixed4 col;
    col = tex2D( _MainTex, input.uv );
    col += tex2D( _MainTex, input.uv + float2( i, i ) * res );
    col += tex2D( _MainTex, input.uv + float2( i, -i ) * res );
    col += tex2D( _MainTex, input.uv + float2( -i, i ) * res );
    col += tex2D( _MainTex, input.uv + float2( -i, -i ) * res );
    col /= 5.0f;

    return col;
}
The rest of the shader is unchanged from the example. You can see the entire file in the complete Github repository that’s linked later.
Step and Clip Shader
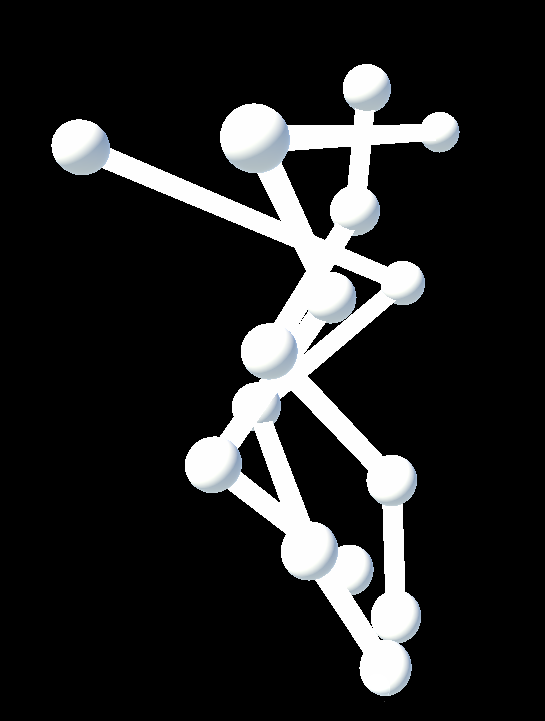
If you recall, a vital piece of this approach is to Smoothstep the final values. Doing so helps everything smush together into a nice blob. At the same time, we perform an alpha clip while drawing to the screen. As a reminder, this is what the approach looks like using Photoshop:


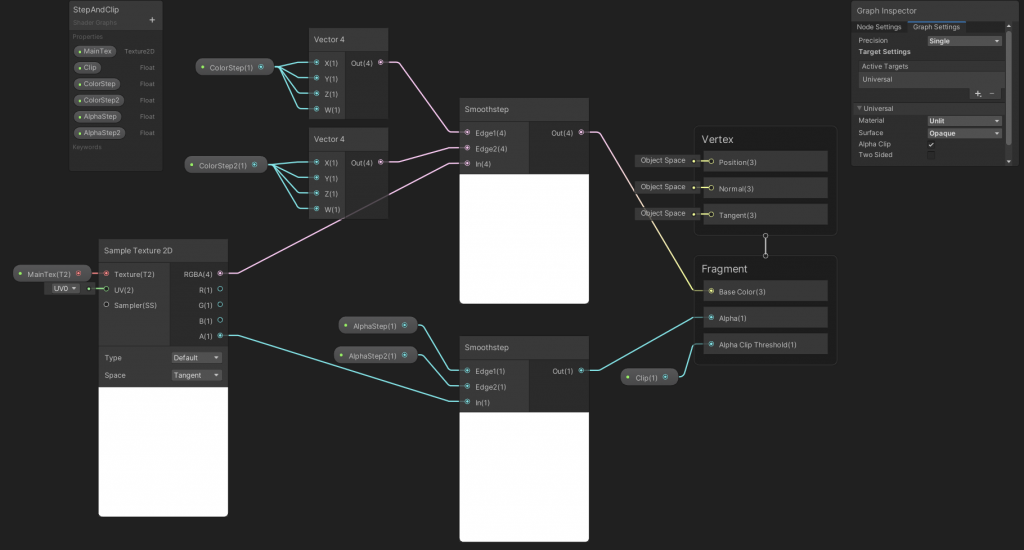
I used Shader Graph for this. The process is straightforward, sample each pixel of our texture, run a Smoothstep on both the colour and the alpha values, then output. Because it’s Shader Graph, there’s room for anyone to experiment with different approaches. Here’s an image of the graph:
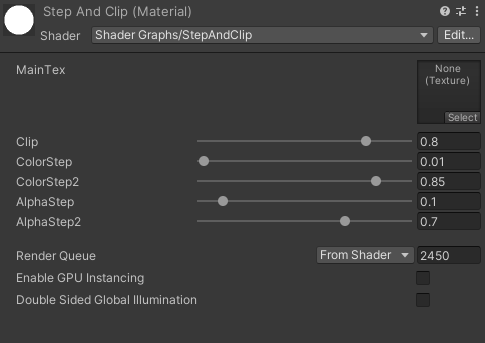
All that’s left now is to put it together. Create a new material with the StepAndClip shader. The values you set will depend on your use case, but this is what I ended up on in this example:
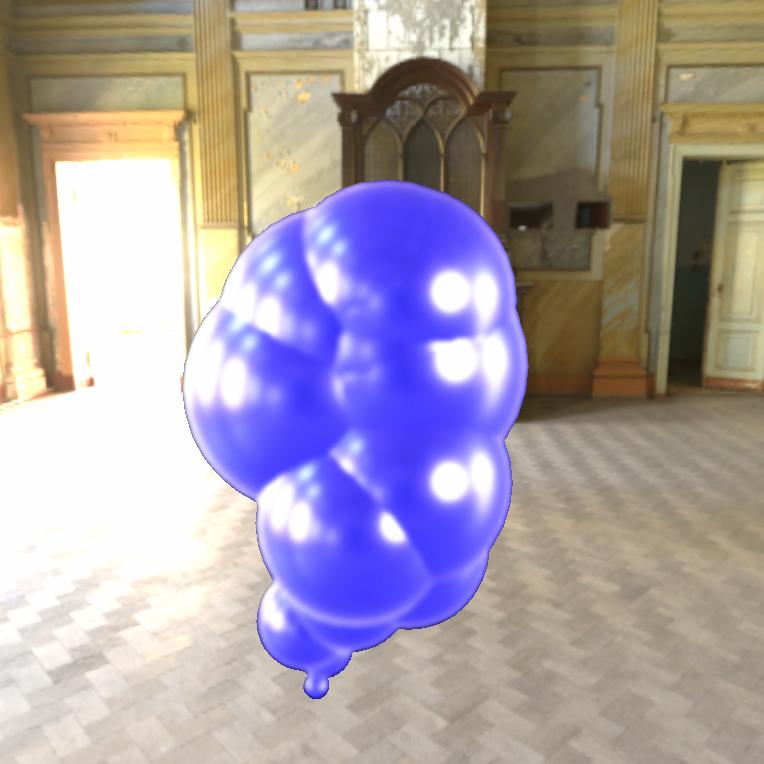
Then it’s time to set up the Render Pipeline Asset. You may have already done this if you followed the previous post, but I’ll go over it again. Ensure the Metaball renderers are on a separate layer. Remove that layer from the Render Pipeline Asset’s layer masks. Add our Renderer Feature, set the layer mask to the Metaball layer, and finally, add a blur material and blit material. The blur material is the one it’ll use to ping pong back and forth between render targets, so a material with the Kawase Blur shader will do. The blit material is the one it’ll use to draw to the screen at the end, so we’ll use our StepAndClip material. With that, we’re all done! You should have a result like this:
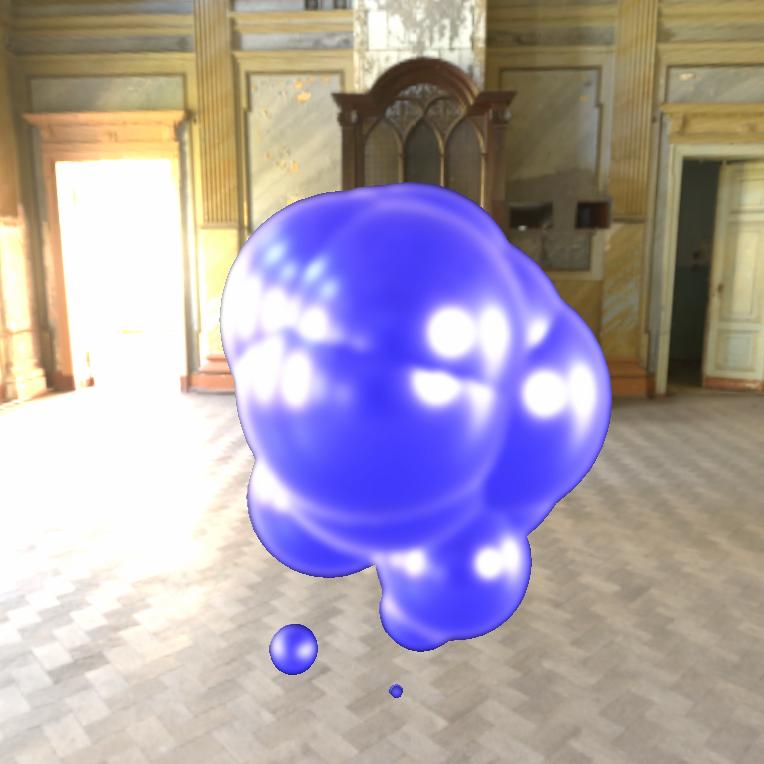
They’re obviously not as attractive as “real” Metaballs, but they’re more optimized and work well under the right circumstances.
If you like my blog, why not sign up for my mailing list here? The complete project is available here on Github. If you want to learn about the Kawase blur, check out this article. If you’d like to see this approach to Metaballs in action, check out this Mix And Jam video on Splatoon’s Ink System.
nav
bro, can you please help me. I made blur shader and applied on texture using render feature. here i want to apply blur on particular layer objects but currently blur is applied in full screen. here is my code.
public override void Execute(ScriptableRenderContext context, ref RenderingData renderingData)
{
SortingCriteria sortingCriteria = (renderQueueType == RenderQueueType.Transparent)
? SortingCriteria.CommonTransparent
: renderingData.cameraData.defaultOpaqueSortFlags;
DrawingSettings drawingSettings = CreateDrawingSettings(_shaderTagIds, ref renderingData, sortingCriteria);
CommandBuffer cmd = CommandBufferPool.Get();
using (new ProfilingScope(cmd, m_ProfilingSampler))
{
context.DrawRenderers(renderingData.cullResults, ref drawingSettings, ref m_FilteringSettings, ref renderStateBlock);
Blit(cmd, renderingData.cameraData.renderer.cameraColorTarget,tem_RT.Identifier(),blur_material,0);
Blit(cmd,tem_RT.Identifier(),renderingData.cameraData.renderer.cameraColorTarget);
context.ExecuteCommandBuffer(cmd);
cmd.Clear();
//Draw to small
}
context.ExecuteCommandBuffer(cmd);
CommandBufferPool.Release(cmd);
}
bronson
To blur specific objects I first draw them to a separate render texture, apply the blur on that render texture, then draw that blurred texture back to the screen. To filter the objects I render to the blur texture, I pass a layer mask to the RenderObjectsPass here. The layer mask is a serialized field, so you can set it via the Inspector.
Does that help? Let me know if there’s something I can clarify.
nav
so here is problem how you apply shader on perticular object or layer in renderer feature please help me.
Paul
This looks pretty much exactly what I need, but I need to know. Does this work with VR? I know that there added complications that can come up with VR. I’m trying to get some sort of fluid simulation effect (similar to Portal’s repulsion gel when it comes out of the pipes) working in Unity.
bronson
I’m not sure, I haven’t worked in VR in a long time. The theory would be the same, but the implementation might differ? I can’t say much more than that unfortunately.
Patrick
Heyyo! Great blog posts here about metaballs and the psuedo-metaballs. Got any idea of why when I set this up the outcome is always the same shade blue? I’ve tried to debug and track down why but I’ve had no success. Unity did tell me that it had to update some URP stuff to get it to open Unity 2021, so maybe that is the reason?
bronson
I believe the the blue shade you’re seeing is the error colour in URP. In the old render pipeline it was magenta, in URP it’s blue iirc. The update might help, or I may need to update it for a newer version of Unity.
Ted
Can you implement that as a global post process volume as an alternative to bloom volume?
cross stitch
Bronson Zgeb’s optimized metaballs are a game-changer in the world of 3D animation. The ability to use a scriptable renderer to easily manipulate the blur pass provides an added level of control and creativity for artists. The efficient algorithms used in this technique allow for faster rendering times and smoother animations. Overall, Zgeb’s work showcases the power of combining advanced mathematical concepts with cutting-edge tools to push the boundaries of digital art.
bronson
Thanks so much!
Ashwin
Thanks Bronson for the great tutorial but how do you blit with z-testing, depth testing or whatever you call it? My blob shows up trough walls. I’m trying to blur a bunch of particles that are created by a VFX Graph but they always show up trough anything.
bronson
That’s an excellent question, I’ve struggled with that issue in the past. I don’t have a perfect answer because it depends on the project, and to be honest its been over two years since I wrote this so I forget the details. But I’ll offer some guidance:
What order are the elements drawing in?
If the metaballs are drawing first, that means that their depth information is being passed correctly through the pipeline, but that their depth is likely just wrong.
If the metaballs are drawing last, that means they either don’t have the depth information from the previous objects that were rendered, or that they are ignoring it. If the depth information isn’t being passed through the pipeline then you’ll have to do something like blit the depth texture from the render objects pass into the metaballs pass. Another option would be to reference the same depth texture from the render objects pass in the metaballs pass, which would avoid a blit. The latter option may not work in older graphics APIs though.
If the metaballs are simply ignoring the depth information, then it’s probably a setting in the Execute method. Maybe sorting criteria?
In any case, the only way to find the answer is to dig around with the Frame Debugger and see what you can learn. Sorry I can’t be more helpful!