Procedural Generation with Cellular Automata
bronson
- posted on
- 5 Comments
In this post, we will explore the basics of cellular automata as a tool for procedural generation. Both cellular automata and procedural generation are topics with near-infinite depth, so we’ll only scratch the surface; however, it’ll provide a base on which to build your knowledge.
What are Cellular Automata?
A cellular automaton is a grid of cells where every cell is in some state belonging to a finite number of states. A single number often represents these states, so as a result, a cellular automaton is essentially a spreadsheet of numbers, which in itself is not particularly exciting. However, cellular automata can model sophisticated, complex behaviours by attaching simple rulesets. One famous example is Conway’s Game of Life, a deep topic in itself. Most CA rulesets have each cell check its neighbours and change its state based on what it finds. A single step of the automaton usually involves every cell applying the ruleset one time, resulting in a new state for the entire grid. Although CAs are used to model physics, biology, fluids, particles, etc. In this post, we’ll start with a simple implementation.
The plan
This post will build a relatively simple CA and demonstrate how it generates cave-like structures. First, we’ll fill a cell grid with randomly distributed live cells. Then, each cell will check how many of its neighbours are alive for each step. If the number passes the threshold, that cell will come alive; otherwise, it will die. After several steps, the grid will reach stasis, and we’ll have our cave. Let’s get started!
Creating the grid
For simplicity, I used a CPU-based approach this time. As a result, our automaton will live inside a 2D int array. We’ll fill a texture, with each pixel representing a cell in the grid, and slap it on a quad in front of the camera to display it.
Our automaton contains two possible states, on and off. So to initialize the grid, we go through every cell and choose a state. The easiest way to do this is to flip a coin, which gives a random distribution. However, to make things a little more interesting, we’ll add a fill percentage to set the ratio of live cells to dead cells on initialization. That way, we can explore the different structures that emerge from different ratios.
public class CellularAutomataGenerator : MonoBehaviour
{
    int[,] _cellularAutomata;

    [SerializeField] int _width;
    [SerializeField] int _height;
    float _fillPercent = 0.5f;

    void ResetAutomata()
    {
        _cellularAutomata = new int[_width, _height];
        for (int x = 0; x < _width; ++x)
        {
            for (int y = 0; y < _height; ++y)
            {
                _cellularAutomata[x, y] = Random.value > _fillPercent ? 0 : 1;
            }
        }
    }

}
Here’s our method to reset the automaton to an initial random state. Next, let’s create a texture to draw the CA’s state.
...

Texture2D _caTexture;

void OnEnable()
{
    ResetAutomata();

   _caTexture = new Texture2D(_width, _height);
    _caTexture.filterMode = FilterMode.Point;
    UpdateTexture();
}

void UpdateTexture()
{
    var pixels = _caTexture.GetPixels();
    for (int i = 0; i < pixels.Length; ++i)
    {
        var value = _cellularAutomata[i % _width, i / _height];
        pixels[i] = value * Color.white;
    }

    _caTexture.SetPixels(pixels);
    _caTexture.Apply();
}
First, we create a texture that’s the same width and height as our cell grid. Then, iterate through each pixel and assign a colour. To determine the colour, look at the corresponding grid cell’s value. If it’s 0, use black; otherwise, white. Finally, apply the pixels so that the texture updates.
Viewing the automaton
Now, let’s create a quad and place it in front of the camera to view the texture. Create the quad in the scene and place it so the camera can see it. Also, create a new material using the Unlit/Texture shader and attach that to the quad’s MeshRenderer. Now we reference that material in the Inspector to attach the texture in the OnEnable method.
...

[SerializeField] Material _material;

void OnEnable()
{
    ResetAutomata();
    _caTexture = new Texture2D(_width, _height);
    _caTexture.filterMode = FilterMode.Point;
    UpdateTexture();
    _material.SetTexture("_MainTex", _caTexture);
}
Now hit play to view the current cell grid. Great! Now let’s talk about the rules of our automaton.
Basic ruleset
When it comes to cellular automata, most rulesets involve having a cell check the state of its neighbouring cells. Then, it has the option to modify its state based on what it finds. We’ll implement one of the simplest versions of that, which is if the number of live neighbours passes a threshold, the cell comes alive; otherwise, it dies. This ruleset is a simplified version of Conway’s Game of Life because we remove the overpopulation clause. Aside from creating cave structures, you could also use it to simulate fire propagation or erosion by water. For example, if everything around you is on fire, you should also be on fire.
Since we’re not concerned with performance right now, we’ll implement this as naively as possible. It’s worth noting that Cellular Automata are an excellent candidate for multithreading and easy to compute on the GPU. We can compute millions or potentially billions of cells in real-time by doing so, but let’s save that for another time.
So with that, let’s look at the code.
int GetNeighbourCellCount(int x, int y)
{
    int neighbourCellCount = 0;
    if (x > 0)
    {
        neighbourCellCount += _cellularAutomata[x - 1, y];
        if (y > 0)
        {
            neighbourCellCount += _cellularAutomata[x - 1, y - 1];
        }
    }

    if (y > 0)
    {
        neighbourCellCount += _cellularAutomata[x, y - 1];
        if (x < _width - 1)
        {
            neighbourCellCount += _cellularAutomata[x + 1, y - 1];
        }
    }

    if (x < _width - 1)
    {
        neighbourCellCount += _cellularAutomata[x + 1, y];
        if (y < _height - 1)
        {
            neighbourCellCount += _cellularAutomata[x + 1, y + 1];
        }
    }

    if (y < _height - 1)
    {
        neighbourCellCount += _cellularAutomata[x, y + 1];
        if (x > 0)
        {
            neighbourCellCount += _cellularAutomata[x - 1, y + 1];
        }
    }

    return neighbourCellCount;
}
Most of the code here is checking if the neighbours are inside the bounds of the automaton. Aside from that, we add all the cells up and return the result.
Next, we’ll write our Step method. This method iterates through every cell, gathering the number of live neighbour cells to see if it meets our threshold. If the cell meets the requirement, it will come to life; otherwise, it dies.
void Step()
{
    int[,] caBuffer = new int[_width, _height];

    for (int x = 0; x < _width; ++x)
    {
        for (int y = 0; y < _height; ++y)
        {
            int liveCellCount = _cellularAutomata[x, y] + GetNeighbourCellCount(x, y);
            caBuffer[x, y] = liveCellCount > _liveNeighboursRequired ? 1 : 0;
        }
    }

    for (int x = 0; x < _width; ++x)
    {
        for (int y = 0; y < _height; ++y)
        {
            _cellularAutomata[x, y] = caBuffer[x, y];
        }
    }
}
By the way, you may have noticed that we perform the cell computations in a separate buffer before copying it to the primary grid. This approach prevents changes to the grid from affecting the cells we haven’t checked yet. Additionally, when multithreading the code, this avoids dependencies between threads and generally makes it trivial to write.
Experimenting
We now have everything we need to experiment with simple Cellular Automata. I hooked up some UI elements to start testing. I linked to a WebGL build and Github repository at the end of this post if you’d like to try it out. Otherwise, here’s what I found.
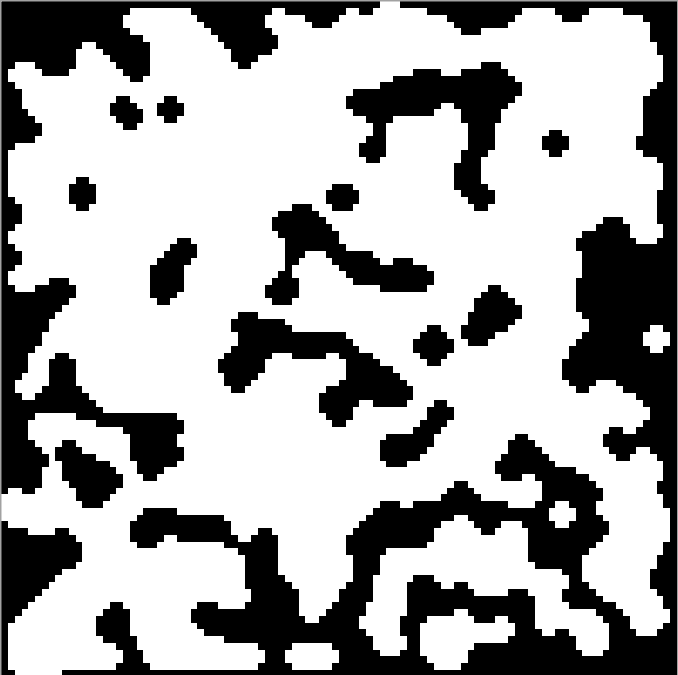
Given the default parameters, the automaton stabilizes into a cave-looking structure within a handful of steps.
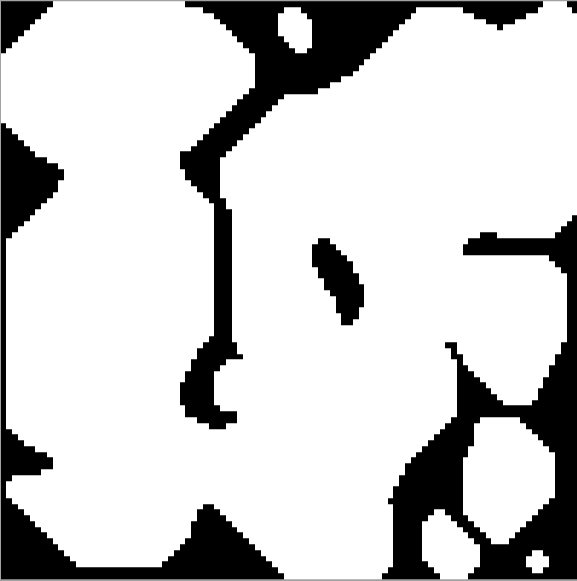
Increasing the starting fill percent trends towards more live cells in the end. Given a high enough percentage, the cave structure turns into a large landmass that resembles a piece of torn parchment.

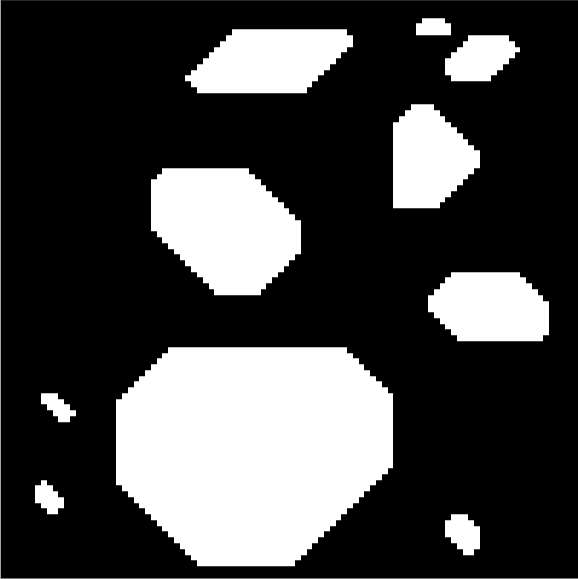
If we generate a stable cave and then decrease the live neighbour threshold to three, the black pixels slowly overtake the white pixels. The result is something that looks more like an island than a cave.
Conversely, increasing the live neighbour threshold to five creates a rising tide effect. That is, the black pixels slowly creep up on the white islands. This approach could simulate tides coming in and out or water levels rising over time.
Next steps
Right now, our automaton exists as a 2D array and a texture. It’s fun to play with but not particularly useful in the context of a game. The next step is to use the data to generate an actual world, which we’ll explore in the future. If you’d like to get started right away, some potential approaches are using the grid as a tilemap or using a technique like marching squares to generate a mesh.
Check out the project on GitHub or play it in your browser here. If you’d like to support my work, join my mailing list. That way, I’ll notify you whenever I write a new post.
Glen Johnson
That’s some cool stuff. I will definitely play around with that code. Thanks!
bronson
Thanks! Let me know how it goes 😀
Jaxon
You didn’t include a screenshot or text documenting when you added the variable ‘_liveNeighboursRequired’
Deeje
Just check the source. Add _liveNeighboursRequired to the top of your script with the default value of 4.
umer23impaf
Hello.
Good luck 🙂