Particle Metaballs in Unity using URP and Shader Graph Part 3
bronson
- posted on
- 6 Comments
This post is part 3 in a series of articles that explain how to draw Metaballs in Unity using the Universal Render Pipeline (URP) and Shader Graph. Click here for part 1 or here for part 2. This part describes:
- How to dig through URPs source to find the built-in PBR lighting function.
- Setting up a custom PBR lighting node.
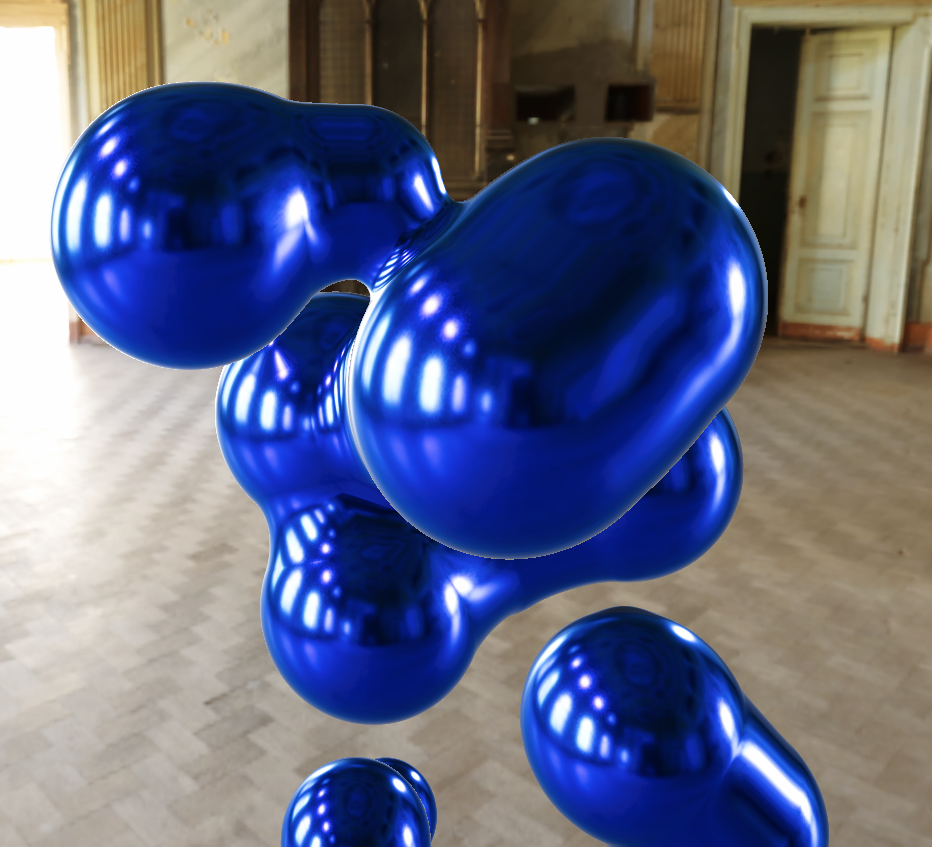
- How to add HDRI and baked lighting to make shiny reflective Metaballs like the ones in the preview.
Let’s go!
PBR Lighting
In an ideal world, we could plug our Metaballs into Shader Graph’s PBR master node. Unfortunately, that node relies on data that the traditional rendering pipeline would normally calculate for us. In our case, we render Metaballs using an unconventional approach so that data is absent or wrong. As a result, the best solution is to create a new custom PBR lighting node that accepts this data as input. However, rather than write our own version of the lighting function, we’ll call the one that’s built-in to URP. So the question becomes, where is this function, and how can we use it?
Time for a bit of a sidebar. One of the greatest strengths of Unity’s Scriptable Render Pipelines is the ability to look through all the source code. Unity has always provided a download link to their built-in shaders, which has been an invaluable resource for me, and now the pipeline itself is open as well. I’ve learned a great deal about graphics programming from reading Unity’s built-in shader code. So, let’s dive into URP.
Inside the Unity Editor’s Project tab, you should see two top-level folders: Assets and Packages. If you expand the Packages folder, and if URP is installed, you’ll find a Universal RP folder. This folder contains all the URP code, including all the shaders. The ShaderLibrary folder contains all the shared shader code, and the Shader folder contains all the URP shaders. URP’s shader code is well organized. Inside ShaderLibrary is a Lighting.hlsl file, and that’s where all the built-in lighting functions live. Search inside this file for PBR, and you’ll find two functions called UniversalFragmentPBR. One of these is just a helper function for the main one. The helper function is convenient because it allows us to pass the SurfaceData as a list of parameters instead of a struct, but what about the other argument: InputData? Our custom PBR function serves this purpose. We’re going to create a function that takes a list of arguments, fills in our InputData struct, and passes it to the UniversalFragmentPBR function. But how do we know what goes into the InputData struct? If you search through all of URP’s files, you’ll find it inside Input.hlsl.
struct InputData
{
    float3  positionWS;
    half3   normalWS;
    half3   viewDirectionWS;
    float4  shadowCoord;
    half    fogCoord;
    half3   vertexLighting;
    half3   bakedGI;
    float2  normalizedScreenSpaceUV;
    half4   shadowMask;
};
This struct has a lot of data to fill out, so let’s get to it! The first three: positionWS, normalWS, and viewDirectionWS are the position, normal and view direction of a pixel of our Metaball in World-Space. Lucky for us, we already calculate these in our SphereTraceMetaballs function. We already output the normal, so we’ll add position and view direction as new outputs. The modified function looks like this:
void SphereTraceMetaballs_float(float3 WorldPosition, out float3 PositionWS, out float3 NormalWS, out float Alpha, out float3 ViewDirection)
{
    #if defined(SHADERGRAPH_PREVIEW)
    PositionWS = float3(0, 0, 0);
    NormalWS = float3(0, 0, 0);
    ViewDirection = float3(0, 0, 0);
    Alpha = 0;
    #else
    float maxDistance = 100;
    float threshold = 0.00001;
    float t = 0;
    int numSteps = 0;

    float outAlpha = 0;

    float3 viewPosition = GetCurrentViewPosition();
    half3 viewDir = SafeNormalize(WorldPosition - viewPosition);
    while (t < maxDistance)
    {
        float minDistance = 1000000;
        float3 from = viewPosition + t * viewDir;
        float d = GetDistanceMetaball(from);
        if (d < minDistance)
        {
            minDistance = d;
        }

        if (minDistance <= threshold * t)
        {
            PositionWS = from;
            NormalWS = CalculateNormalMetaball(from);
            ViewDirection = viewDir;
            outAlpha = 1;
            break;
        }

        t += minDistance;
        ++numSteps;
    }

    Alpha = outAlpha;
    #endif
}
The difference is there are new outputs in the function signature, and we set those outputs along with the NormalWS and outAlpha. Next, we’re going to cheat by setting most of the InputData to a reasonable default. That means setting most of them to 0. I can justify this because rendering Metaballs is arguably too expensive for a real-time 3d application anyway, so we don’t need to support all the features. However, if you’re motivated, you can dig through the URP code to find how to calculate each value and implement them in your code. Now we can write our PBR Custom Function Node:
void PBR_float(float3 positionWS, half3 normalWS, half3 viewDirectionWS, half3 bakedGI, half3 albedo, half metallic, half3 specular, half smoothness, half occlusion, half3 emission, half alpha, out float3 Color)
{
#if defined(SHADERGRAPH_PREVIEW)
Color = float3(1, 1, 1);
#else
InputData inputData;
inputData.positionWS = positionWS;
inputData.normalWS = NormalizeNormalPerPixel(normalWS);
inputData.viewDirectionWS = SafeNormalize(-viewDirectionWS);
inputData.shadowCoord = half4(0, 0, 0, 0);
inputData.fogCoord = 0;
inputData.vertexLighting = half3(0, 0, 0);
inputData.normalizedScreenSpaceUV = half2(0, 0);
inputData.shadowMask = half4(0, 0, 0, 0);
inputData.bakedGI = bakedGI;
Color = UniversalFragmentPBR(inputData, albedo, metallic, specular, smoothness, occlusion, emission, alpha);
#endif
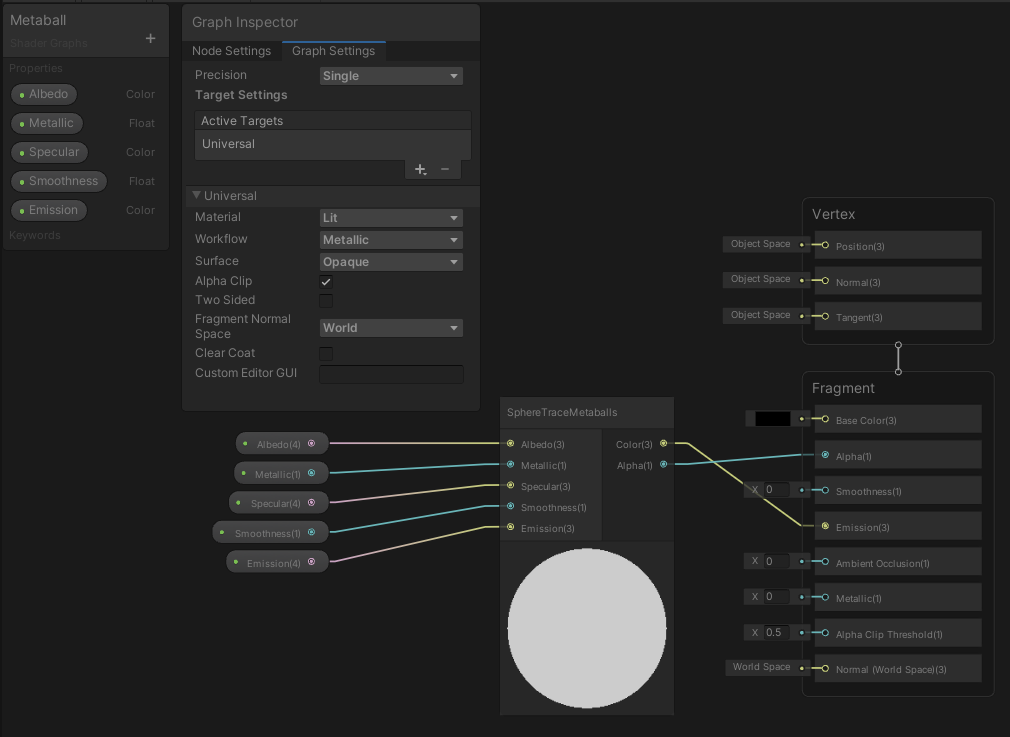
}The function is straightforward. Take all the standard PBR inputs (with a couple of extras), create and fill a new InputData struct, pass it to the built-in UniversalFragmentPBR function, and that’s it! Now in Shader Graph, we create a new Custom Function node for this PBR function. At this point, we need to plug in values. The position, normal, and view direction come from the SphereTraceMetaballs node output. We’ll get the rest of the inputs from material properties. Add Albedo, Metallic, Specular, Smoothness and Emission properties to the graph. Connect those values, set BakedGI to (0, 0, 0) and Occlusion to 1. Alternatively, if you want to use BakedGI, Shader Graph has a built-in BakedGI node you could use as well. It’s a bit messy, so I put mine into a subgraph that looks like this:
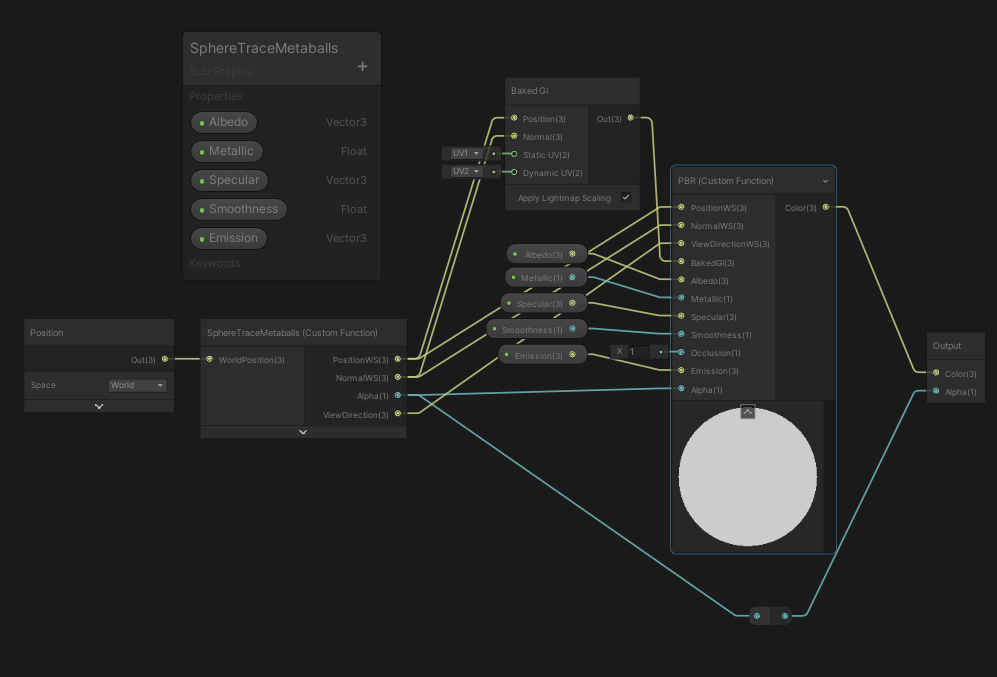
And my main graph looks like this:
Great! To finish it off, let’s add an HDRI to create some interesting reflections.
Add an HDRI
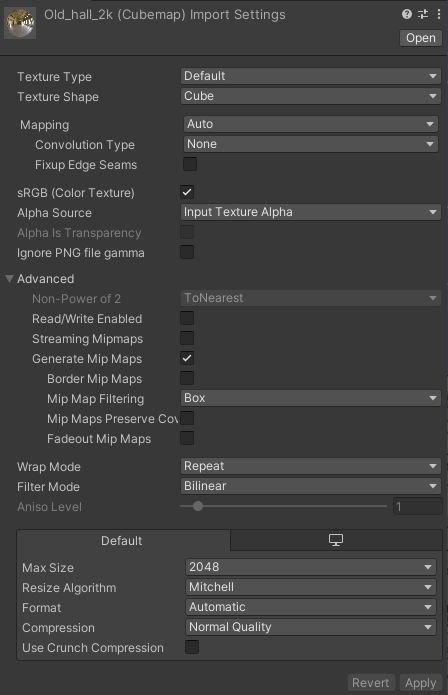
So, let’s grab a free example HDRI from HDRI Haven. Any HDRI will do, so pick one that seems interesting to you. I’m using an indoor environment because they have more details that add to the visual interest. Drop your HDRI into the project and set the Texture Shape to Cube in the import settings. Here’s what mine looks like:
Create a new material using the Skybox > Cubemap shader and add your newly imported Cubemap. Finally, go into the Lighting Settings and set the Skybox Material to your new material. The last step is to create a Reflection Probe in the scene. You can do this from the menu by following: Game Object > Light > Reflection Probe. Select the new Reflection Probe and press Bake in the inspector. Now, run the simulation and you’ll see something like this:
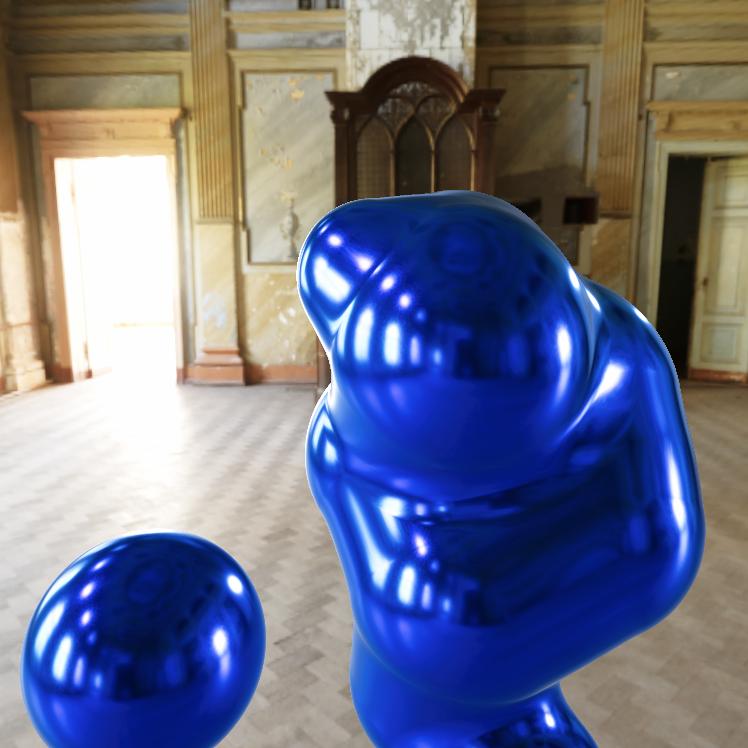
So with that, we’ve finished our high resolution, albeit expensive to render, Metaballs. Unfortunately, I think they’re too costly to use in a real-time 3d application, so I’ve experimented with ways to make them more performant. In the next post, I’ll share those experiments and the interesting tricks I learned along the way.
The complete project for part 3 of the series is available here on Github. If you enjoy this content, please consider signing up to my mailing list here to be notified when the next post is released.
Shannon
Thanks for this. These tutes have been great.
bronson
Thanks! I’m happy to hear they’re useful 😀
Nix Valentine
How is your take on the featured game Ordia’s 2d GPU meta ball? https://twitter.com/luke161/status/1089145016931532806
Is it possible for a tutorial on how to do it?
Also, I’m digging on all of your tutorials right now. They are fascinating and well-made.
bronson
Thanks so much! I’ll definitely explore a 2d meta ball implementation for a future post 😀
Indie Developer
How can i optimize this? I want to use it in my game, but fps is so low (40 fps when just metaball particle). I can’t use it for now. U have any idea?
bronson
Definitely! The slowest part is checking every metaball against every other metaball, so the first step would be to implement some kind of spatial partitioning like a BVH or Octree or something. If that’s not enough, I would move as much of the calculation as possible to a compute shader so you can asynchronously pre-calculate during the update loop, reducing the amount of work to do during the rendering loop.
On the other hand, if you’d rather save some time and want a solution that already works you could also look up the MudBun package on the Unity Asset Store.