Particle Metaballs in Unity using URP and Shader Graph Part 2
bronson
- posted on
- No Comment
This post is part 2 in a series of articles that explain how to draw Metaballs in Unity using the Universal Render Pipeline (URP) and Shader Graph. Click here for part 1. This part describes:
- How to send position and size data from a particle system to our shader.
- How to write the Metaball shader function.
- How to add lighting to our Metaballs.
Let’s get to work!
Sending data from a Particle System to the GPU
Compared to everything else, sending data from the Particle System to the GPU is relatively easy. Create a new MonoBehaviour called MetaballParticleManager.cs to start. This script will read information from the Particle System and pass it to the GPU. In this case, my preferred way to send the data is using a MaterialPropertyBlock because it’s easy to support multiple Particle Systems without juggling instanced materials. By the way, MaterialPropertyBlocks are exactly what they sound like: a block of data that holds material properties. The three things we need are a Particle System from which we read the data, a MaterialPropertyBlock into which we write the data, and a renderer to accept the MaterialPropertyBlock. So in our MetaballParticleManager we’ll create a reference to each of these. We’ll set them up OnEnable and clean them up OnDisable:
ParticleSystem _particleSystem;
Renderer _renderer;
MaterialPropertyBlock _materialPropertyBlock;

void OnEnable()
{
    _particleSystem = GetComponent<ParticleSystem>();
    _materialPropertyBlock = new MaterialPropertyBlock();
    _renderer = _particleSystem.GetComponent<Renderer>();
}

void OnDisable()
{
    _materialPropertyBlock.Clear();
    _materialPropertyBlock = null;
    _renderer.SetPropertyBlock(null);
}
Next, in Update, we’ll get each of our particles’ position and size to write to the MaterialPropertyBlock. By the way, we’re going to use a fixed-size array on the GPU to hold our particle data for the sake of simplicity. So we’ll need a constant to hold the maximum number of particles and send the current number of particles over to the GPU. Ok, back to Update. Getting access to the particle data is simple but a bit lengthy. First, we get the number of particles in the system, then we use GetParticles and pass in an array to store them in. The array is of size MaxParticles, and GetParticles takes a count as a parameter, so we also pass in MaxParticles. This way, GetParticles will only return the first 256 particles (in our case) rather than go out of the array bounds. We then store each particle’s position and size into their respective arrays and exit our for loop early if we reach the current number of particles. Finally, we set all these values in our MaterialPropertyBlock and pass the block to the renderer.
const int MaxParticles = 256;
int _numParticles;

ParticleSystem.Particle[] _particles = new ParticleSystem.Particle[MaxParticles];

readonly Vector4[] _particlesPos = new Vector4[MaxParticles];
readonly float[] _particlesSize = new float[MaxParticles];

void Update()
{
    _numParticles = _particleSystem.particleCount;
    _particleSystem.GetParticles(_particles, MaxParticles);

    int i = 0;
    foreach (var particle in _particles)
    {
        _particlesPos[i] = particle.position;
        _particlesSize[i] = particle.GetCurrentSize(_particleSystem);
        ++i;

        if (i >= _numParticles) break;
    }

    _materialPropertyBlock.SetVectorArray(ParticlesPos, _particlesPos);
    _materialPropertyBlock.SetFloatArray(ParticlesSize, particlesSize);
    _materialPropertyBlock.SetInt(NumParticles, _numParticles);
    _renderer.SetPropertyBlock(_materialPropertyBlock);
}
You’ll notice some variables I haven’t mentioned: ParticlePos, ParticlesSize, and NumParticles. These are the names of our shader properties converted into an ID. In the MonoBehaviour we declare them like so:
static readonly int NumParticles = Shader.PropertyToID("_NumParticles");
static readonly int ParticlesSize = Shader.PropertyToID("_ParticlesSize");
static readonly int ParticlesPos = Shader.PropertyToID("_ParticlesPos");
And then, in our shader, we’ll declare the properties _NumParticles, _ParticlesSize, and _ParticlesPos. We’re telling the MaterialPropertyBlock how to map the data we’re supplying to variables in our shader. So then, add these lines to the top of our Metaball.hlsl shader:
#define MAX_PARTICLES 256

float4 _ParticlesPos[MAX_PARTICLES];
float _ParticlesSize[MAX_PARTICLES];
float _NumParticles;
And with that, we’re done passing data from our Particle System to our shader. You can see the completed MetaballParticleManager.cs here and Metaball.hlsl here.
GetDistanceMetaball Function
At the end of the last post, we were drawing an SDF Sphere. Now we’re going to upgrade from SDFs to Metaballs. What’s the difference between an SDF sphere and a Metaball? Not that much in practice. They’re both implicitly defined sphere-shaped objects. Using SDF spheres with a blending function, we can recreate something visually identical to Metaballs. However, unlike SDF spheres that merge using a blending function, a Metaball’s density defines when they combine and split apart. You could say that the Metaball definition merges objects by default, whereas joining SDF-based objects is optional. Anyway, let’s get to the code. I won’t go over this code line-by-line. Instead, I’ll share the source from which I learned how to write it later in this post. To truly understand how Metaballs work, I recommend reading that source. Here’s the GetDistanceMetaball function:
float GetDistanceMetaball(float3 p)
{
    float sumDensity = 0;
    float sumRi = 0;
    float minDistance = 100000;
    for (int i = 0; i < _NumParticles; ++i)
    {
        float4 center = _ParticlesPos[i];
        float radius = 0.3 * _ParticlesSize[i];
        float r = length(center - p);
        if (r <= radius)
        {
            sumDensity += 2 * (r * r * r) / (radius * radius * radius) - 3 * (r * r) / (radius * radius) + 1;
        }
        minDistance = min(minDistance, r - radius);
        sumRi += radius;
    }

    return max(minDistance, (0.2 - sumDensity) / (3 / 2.0 * sumRi));
}
You’ll notice that we’re using the data from the ParticleSystem. The gist of this is that for each pixel, we have it iterate through every particle. For each particle, we check if the given pixel has enough density to be within our mass of balls or not. If it’s not apparent already, rendering Metaballs is not cheap. I’ll show you some of the ways I tried to make them more performant later in the series. Let’s modify the SphereTraceMetaballs function in Metaball.hlsl to use this new function. Replace GetDistanceSphere on line 30 with GetDistanceMetaball. We no longer need to pass the position and radius because we have that data from the Particle System. So line 30 becomes:
float d = GetDistanceMetaball(from);
Now feel free to test it out. In your scene, create a new Particle System. Attach the MetaballParticleManager component. Ensure the Particle System Simulation Space is World rather than Local; otherwise, the particle positions we’re supplying to the shader will be wrong. Finally, change the material to our Sphere-Tracer material, and you’ll see Metaballs in your scene. It’s hard to know if they’re merging without lighting, so let’s add that next.
Lighting
To calculate lighting, we need normals. Let’s add a function to calculate the normals of our Metaballs. The explanation for this source code is available from the same reference as the GetDistanceMetaball function, which I’ll share later in this post. We’ll add this CalculateNormalMetaball function to the Metaball.hlsl file:
float3 CalculateNormalMetaball(float3 from)
{
    float delta = 10e-5;
    float3 normal = float3(
        GetDistanceMetaball(from + float3(delta, 0, 0)) - GetDistanceMetaball(from + float3(-delta, 0, 0)),
        GetDistanceMetaball(from + float3(0, delta, 0)) - GetDistanceMetaball(from + float3(-0, -delta, 0)),
        GetDistanceMetaball(from + float3(0, 0, delta)) - GetDistanceMetaball(from + float3(0, 0, -delta))
    );
    return normalize(normal);
}
It works by checking the change in position between the current pixel and the surrounding pixels. Modify the SphereTraceMetaballs_float function to add a new output: out float3 NormalWS. Then after we set the outAlpha on line 78 we calculate the normal. That’s because this is the point in the code where we’ve confirmed the existence of a Metaball. So, add the line NormalWS = CalculateNormalMetaball(from);. Also, don’t forget to add NormalWS = float3(0, 0, 0); inside the #if defined(SHADERGRAPH_PREVIEW) block. Otherwise, you’ll get an error when the Shader Graph file is open. In the end the function will look like this:
void SphereTraceMetaballs_float(float3 WorldPosition, out float Alpha, out float3 NormalWS)
{
#if defined(SHADERGRAPH_PREVIEW)
Alpha = 1;
NormalWS = float3(0, 0, 0);
#else
float maxDistance = 100;
float threshold = 0.00001;
float t = 0;
int numSteps = 0;
float outAlpha = 0;
float3 viewPosition = GetCurrentViewPosition();
half3 viewDir = SafeNormalize(WorldPosition - viewPosition);
while (t < maxDistance)
{
float minDistance = 1000000;
float3 from = viewPosition + t * viewDir;
float d = GetDistanceMetaball(from);
if (d < minDistance)
{
minDistance = d;
}
if (minDistance <= threshold * t)
{
outAlpha = 1;
NormalWS = CalculateNormalMetaball(from);
break;
}
t += minDistance;
++numSteps;
}
Alpha = outAlpha;
#endif
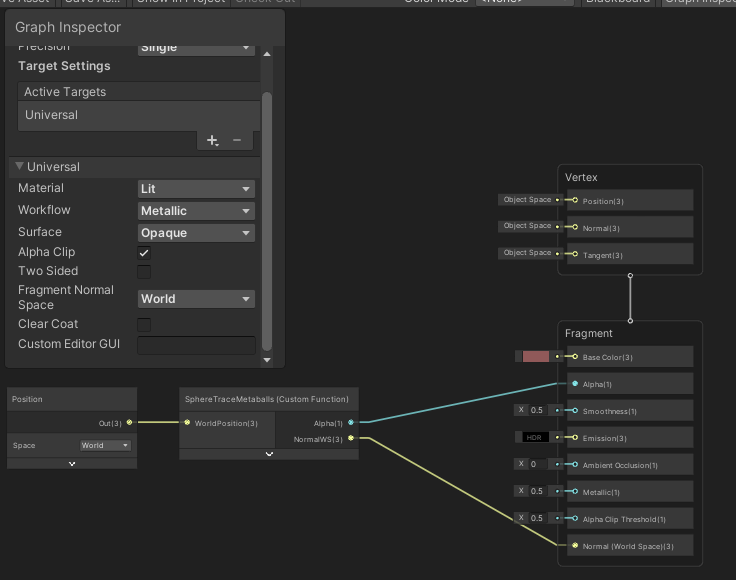
}Now let’s modify the Metaball Shader Graph. Add an output to our SphereTraceMetaballs custom function node for the NormalWS. Change Fragment Normal Space of Graph Settings to World since our normal is in world space. Finally, plug the output from the Custom Function node into the Normal slot of the Fragment output. When finished, the graph will look like this:
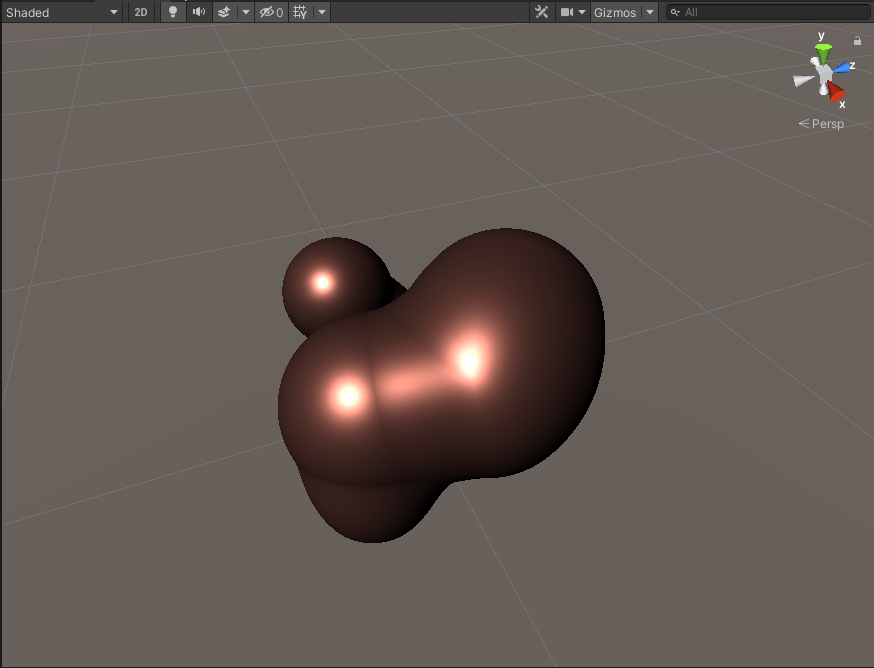
And you’ll have simple lighting on your Metaballs. Unfortunately, if you’re hoping for full fancy PBR lighting, we aren’t there yet. However, this is enough to test if your Metaballs are working correctly. To finish our lighting setup, we need to dig through the URP source code. Since I’ve already covered a lot today, I’m going to leave that until part 3.
In this part, we passed data from a particle system to our Metaball shader. We replaced our SDF Sphere with multiple Metaballs. And, we calculated the normal to add simple lighting.
You can find the completed part 2 of the series here on Github. As promised, here’s a link to the series where I learned the technical details of Metaballs. Sign up to my mailing list here to be notified when part 3 of the series is released.