Custom Lighting in URP with Shader Graph

This article will demonstrate how to support custom lighting functions when using URP and Shader Graph. We’ll start by exploring how Shader Graph works. Then, we’ll build a tool to override the default behaviour with our custom behaviour. There’s a lot to cover, so let’s get started.
Why would we want to do this?
Shader Graph is a fantastic tool to enable artists to iterate on shaders. However, because it only supports PBR and Unlit workflows, it’s not very good at allowing non-photorealistic rendering. If you look around the internet, you’ll find hacky ways to do toon shading in Shader Graph, but in one way or another, they all struggle with casting and receiving shadows. So we’ll solve this problem by enabling Shader Graph to use our custom lighting functions. You’ll be able to write an entire custom vertex and fragment function, too, so you can push your lighting “backend” as far as you need while still enabling artists to describe an object’s surface via Shader Graph. If that’s appealing to you, then read on!
How does Shader Graph work?
When you create a Shader Graph, you’re writing a function that describes the surface of an object. The output of the graph are properties such as the BaseColor, Emission, Smoothness, etc. These are properties that describe a surface. So a Shader Graph generates a function called SurfaceDescriptionFunction. Then, the system grabs a pre-written shader template and links it to the newly generated SurfaceDescriptionFunction. It does other stuff too, but that’s irrelevant for our goals. This system allows artists to focus on defining an object’s surface without worrying about all the technical boilerplate code the renderer needs. It also means we can use custom boilerplate code if we can inject it into the process. So that’s what we’ll do!
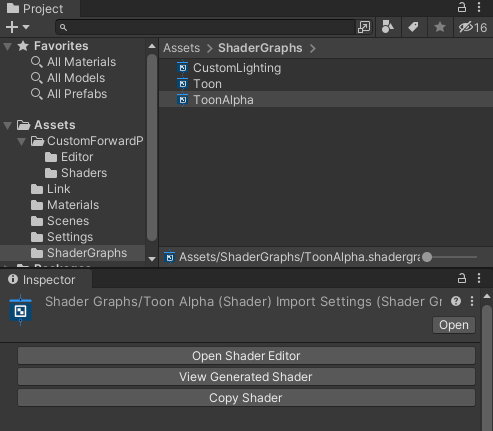
Let’s get deeper into the details. Click on any Shader Graph file, and you’ll see an option to “View Generated Shader” in the Inspector. Inspect the generated shader file, and you’ll see it’s mostly a bunch of similar-looking passes that #include several common files. There isn’t even a vertex or fragment function. That’s because the Shader Graph doesn’t generate the vertex and fragment functions; it includes them from other files. This simplifies our job because if we modify which files we include, we can control how we render objects. In other words, remove the generated vertex and frag functions, insert ours, and the pipeline is under our control.
The manual way
Let me show you. Currently, I’m inspecting a generated shader. Since I’m accustomed to writing shaders in Unity, I can identify the Forward Pass called “Universal Forward”. The pass references a function frag, that’s not present in this file. I also notice the line #include "Packages/com.unity.render-pipelines.universal/Editor/ShaderGraph/Includes/PBRForwardPass.hlsl". Since URP is a package, I can investigate the code, so I open that file. What do I find inside? The frag function.
half4 frag(PackedVaryings packedInput) : SV_TARGET
{
    Varyings unpacked = UnpackVaryings(packedInput);
    UNITY_SETUP_INSTANCE_ID(unpacked);
    UNITY_SETUP_STEREO_EYE_INDEX_POST_VERTEX(unpacked);

    SurfaceDescriptionInputs surfaceDescriptionInputs = BuildSurfaceDescriptionInputs(unpacked);
    SurfaceDescription surfaceDescription = SurfaceDescriptionFunction(surfaceDescriptionInputs);

    #if _AlphaClip
        half alpha = surfaceDescription.Alpha;
        clip(alpha - surfaceDescription.AlphaClipThreshold);
    #elif _SURFACE_TYPE_TRANSPARENT
        half alpha = surfaceDescription.Alpha;
    #else
    half alpha = 1;
    #endif

    InputData inputData;
    BuildInputData(unpacked, surfaceDescription, inputData);

    #ifdef _SPECULAR_SETUP
        float3 specular = surfaceDescription.Specular;
        float metallic = 1;
    #else
    float3 specular = 0;
    float metallic = surfaceDescription.Metallic;
    #endif

    SurfaceData surface = (SurfaceData)0;
    surface.albedo = surfaceDescription.BaseColor;
    surface.metallic = saturate(metallic);
    surface.specular = specular;
    surface.smoothness = saturate(surfaceDescription.Smoothness),
        surface.occlusion = surfaceDescription.Occlusion,
        surface.emission = surfaceDescription.Emission,
        surface.alpha = saturate(alpha);
    surface.clearCoatMask = 0;
    surface.clearCoatSmoothness = 1;

    #ifdef _CLEARCOAT
        surface.clearCoatMask       = saturate(surfaceDescription.CoatMask);
        surface.clearCoatSmoothness = saturate(surfaceDescription.CoatSmoothness);
    #endif

    half4 color = UniversalFragmentPBR(inputData, surface);

    color.rgb = MixFog(color.rgb, inputData.fogCoord);
    return color;
}
Here, I also noticed a reference to SurfaceDescriptionFunction, which was generated from the Shader Graph and placed inside the generated shader file.
So, all we have to do is copy the file PBRForwardPass.hlsl into our project and modify the #include line to point to our version. If you want to test it, take the code from the generated file and save it into a new file in the same directory as your custom PBRForwardPass.hlsl file. Then, replaced every instance of #include "Packages/com.unity.render-pipelines.universal/Editor/ShaderGraph/Includes/PBRForwardPass.hlsl" with #include "PBRForwardPass.hlsl", or whatever name you chose. Finally, modify the frag function to return half4(1, 0, 0, 1). Now every material you apply this shader to will be red. Pretty neat, right? Well, there are two big issues. First, manually changing the generated file every time is a terrible workflow. Second, I haven’t shown you how to write a custom lighting function. Let’s start with the second one.
Custom Lighting Function
This next part is a little technical. If you aren’t familiar with handwritten shaders, it may be challenging to follow. That’s because, unfortunately, this approach to custom lighting functions requires a handwritten pass. However, we don’t have to start from scratch! All Unity’s shader code is available in one way or another, so let’s start by duplicating the files we need and go from there.
Like we said in the previous section, the file we want is Packages/Universal RP/Editor/ShaderGraph/Includes/PBRForwardPass.hlsl. If you haven’t already, copy that into your project and rename it to CustomForwardPass.hlsl. This file contains the vert and frag functions that Lit URP Shader Graphs pass through. By the way, we could isolate the file with the lighting function instead, but why not take control of the entire forward pass?
The frag function references a function called UniversalFragmentPBR to calculate the lighting. This function isn’t part of this file, so let’s duplicate it as well. This one is inside Packages/Universal RP/ShaderLibrary/Lighting.hlsl. Copy the function half4 UniversalFragmentPBR(InputData inputData, SurfaceData surfaceData) to the top of CustomForwardPass.hlsl. Let’s also copy LightingPhysicallyBased from Lighting.hlsl into CustomForwardPass.hlsl, since we’re going to need it soon. We’ll give the functions custom names and make sure we change all references to our custom version. In the end, you’ll have a version that looks like this.
half3 LightingCustom(BRDFData brdfData, BRDFData brdfDataClearCoat,
                                    half3 lightColor, half3 lightDirectionWS, half lightAttenuation,
                                    half3 normalWS, half3 viewDirectionWS,
                                    half clearCoatMask, bool specularHighlightsOff)
{
    half NdotL = saturate(dot(normalWS, lightDirectionWS));
    half3 radiance = lightColor * (lightAttenuation * NdotL);

    half3 brdf = brdfData.diffuse;
    #ifndef _SPECULARHIGHLIGHTS_OFF
    [branch] if (!specularHighlightsOff)
    {
        brdf += brdfData.specular * DirectBRDFSpecular(brdfData, normalWS, lightDirectionWS, viewDirectionWS);

        #if defined(_CLEARCOAT) || defined(_CLEARCOATMAP)
        // Clear coat evaluates the specular a second timw and has some common terms with the base specular.
        // We rely on the compiler to merge these and compute them only once.
        half brdfCoat = kDielectricSpec.r * DirectBRDFSpecular(brdfDataClearCoat, normalWS, lightDirectionWS, viewDirectionWS);

            // Mix clear coat and base layer using khronos glTF recommended formula
            // https://github.com/KhronosGroup/glTF/blob/master/extensions/2.0/Khronos/KHR_materials_clearcoat/README.md
            // Use NoV for direct too instead of LoH as an optimization (NoV is light invariant).
            half NoV = saturate(dot(normalWS, viewDirectionWS));
            // Use slightly simpler fresnelTerm (Pow4 vs Pow5) as a small optimization.
            // It is matching fresnel used in the GI/Env, so should produce a consistent clear coat blend (env vs. direct)
            half coatFresnel = kDielectricSpec.x + kDielectricSpec.a * Pow4(1.0 - NoV);

        brdf = brdf * (1.0 - clearCoatMask * coatFresnel) + brdfCoat * clearCoatMask;
        #endif // _CLEARCOAT
    }
    #endif // _SPECULARHIGHLIGHTS_OFF

    return brdf * radiance;
}

half3 LightingCustom(BRDFData brdfData, BRDFData brdfDataClearCoat, Light light, half3 normalWS,
                                    half3 viewDirectionWS, half clearCoatMask, bool specularHighlightsOff)
{
    return LightingCustom(brdfData, brdfDataClearCoat, light.color, light.direction,
                                         light.distanceAttenuation * light.shadowAttenuation, normalWS, viewDirectionWS,
                                         clearCoatMask, specularHighlightsOff);
}

half4 UniversalFragmentCustom(InputData inputData, SurfaceData surfaceData)
{
    #ifdef _SPECULARHIGHLIGHTS_OFF
    bool specularHighlightsOff = true;
    #else
    bool specularHighlightsOff = false;
    #endif

    BRDFData brdfData;

    // NOTE: can modify alpha
    InitializeBRDFData(surfaceData.albedo, surfaceData.metallic, surfaceData.specular, surfaceData.smoothness,
                       surfaceData.alpha, brdfData);

    BRDFData brdfDataClearCoat = (BRDFData)0;
    #if defined(_CLEARCOAT) || defined(_CLEARCOATMAP)
    // base brdfData is modified here, rely on the compiler to eliminate dead computation by InitializeBRDFData()
    InitializeBRDFDataClearCoat(surfaceData.clearCoatMask, surfaceData.clearCoatSmoothness, brdfData, brdfDataClearCoat);
    #endif

    // To ensure backward compatibility we have to avoid using shadowMask input, as it is not present in older shaders
    #if defined(SHADOWS_SHADOWMASK) && defined(LIGHTMAP_ON)
    half4 shadowMask = inputData.shadowMask;
    #elif !defined (LIGHTMAP_ON)
    half4 shadowMask = unity_ProbesOcclusion;
    #else
    half4 shadowMask = half4(1, 1, 1, 1);
    #endif

    Light mainLight = GetMainLight(inputData.shadowCoord, inputData.positionWS, shadowMask);

    #if defined(_SCREEN_SPACE_OCCLUSION)
        AmbientOcclusionFactor aoFactor = GetScreenSpaceAmbientOcclusion(inputData.normalizedScreenSpaceUV);
        mainLight.color *= aoFactor.directAmbientOcclusion;
        surfaceData.occlusion = min(surfaceData.occlusion, aoFactor.indirectAmbientOcclusion);
    #endif

    MixRealtimeAndBakedGI(mainLight, inputData.normalWS, inputData.bakedGI);
    half3 color = GlobalIllumination(brdfData, brdfDataClearCoat, surfaceData.clearCoatMask,
                                     inputData.bakedGI, surfaceData.occlusion,
                                     inputData.normalWS, inputData.viewDirectionWS);
    color += LightingCustom(brdfData, brdfDataClearCoat,
                                           mainLight,
                                           inputData.normalWS, inputData.viewDirectionWS,
                                           surfaceData.clearCoatMask, specularHighlightsOff);

    #ifdef _ADDITIONAL_LIGHTS
    uint pixelLightCount = GetAdditionalLightsCount();
    for (uint lightIndex = 0u; lightIndex < pixelLightCount; ++lightIndex)
    {
        Light light = GetAdditionalLight(lightIndex, inputData.positionWS, shadowMask);
    #if defined(_SCREEN_SPACE_OCCLUSION)
            light.color *= aoFactor.directAmbientOcclusion;
    #endif
        color += LightingCustom(brdfData, brdfDataClearCoat,
                                         light,
                                         inputData.normalWS, inputData.viewDirectionWS,
                                         surfaceData.clearCoatMask, specularHighlightsOff);
    }
    #endif

    #ifdef _ADDITIONAL_LIGHTS_VERTEX
    color += inputData.vertexLighting * brdfData.diffuse;
    #endif

    color += surfaceData.emission;

    return half4(color, surfaceData.alpha);
}

void BuildInputData(Varyings input, SurfaceDescription surfaceDescription, out InputData inputData)
{
    inputData.positionWS = input.positionWS;

    #ifdef _NORMALMAP
    #if _NORMAL_DROPOFF_TS
    // IMPORTANT! If we ever support Flip on double sided materials ensure bitangent and tangent are NOT flipped.
    float crossSign = (input.tangentWS.w > 0.0 ? 1.0 : -1.0) * GetOddNegativeScale();
    float3 bitangent = crossSign * cross(input.normalWS.xyz, input.tangentWS.xyz);
    inputData.normalWS = TransformTangentToWorld(surfaceDescription.NormalTS,
                                                 half3x3(input.tangentWS.xyz, bitangent, input.normalWS.xyz));
    #elif _NORMAL_DROPOFF_OS
            inputData.normalWS = TransformObjectToWorldNormal(surfaceDescription.NormalOS);
    #elif _NORMAL_DROPOFF_WS
            inputData.normalWS = surfaceDescription.NormalWS;
    #endif
    #else
        inputData.normalWS = input.normalWS;
    #endif
    inputData.normalWS = NormalizeNormalPerPixel(inputData.normalWS);
    inputData.viewDirectionWS = SafeNormalize(input.viewDirectionWS);

    #if defined(REQUIRES_VERTEX_SHADOW_COORD_INTERPOLATOR)
        inputData.shadowCoord = input.shadowCoord;
    #elif defined(MAIN_LIGHT_CALCULATE_SHADOWS)
        inputData.shadowCoord = TransformWorldToShadowCoord(inputData.positionWS);
    #else
    inputData.shadowCoord = float4(0, 0, 0, 0);
    #endif

    inputData.fogCoord = input.fogFactorAndVertexLight.x;
    inputData.vertexLighting = input.fogFactorAndVertexLight.yzw;
    inputData.bakedGI = SAMPLE_GI(input.lightmapUV, input.sh, inputData.normalWS);
    inputData.normalizedScreenSpaceUV = GetNormalizedScreenSpaceUV(input.positionCS);
    inputData.shadowMask = SAMPLE_SHADOWMASK(input.lightmapUV);
}

PackedVaryings vert(Attributes input)
{
    Varyings output = (Varyings)0;
    output = BuildVaryings(input);
    PackedVaryings packedOutput = (PackedVaryings)0;
    packedOutput = PackVaryings(output);
    return packedOutput;
}

half4 frag(PackedVaryings packedInput) : SV_TARGET
{
    Varyings unpacked = UnpackVaryings(packedInput);
    UNITY_SETUP_INSTANCE_ID(unpacked);
    UNITY_SETUP_STEREO_EYE_INDEX_POST_VERTEX(unpacked);

    SurfaceDescriptionInputs surfaceDescriptionInputs = BuildSurfaceDescriptionInputs(unpacked);
    SurfaceDescription surfaceDescription = SurfaceDescriptionFunction(surfaceDescriptionInputs);

    #if _AlphaClip
        half alpha = surfaceDescription.Alpha;
        clip(alpha - surfaceDescription.AlphaClipThreshold);
    #elif _SURFACE_TYPE_TRANSPARENT
        half alpha = surfaceDescription.Alpha;
    #else
    half alpha = 1;
    #endif

    InputData inputData;
    BuildInputData(unpacked, surfaceDescription, inputData);

    #ifdef _SPECULAR_SETUP
        float3 specular = surfaceDescription.Specular;
        float metallic = 1;
    #else
    float3 specular = 0;
    float metallic = surfaceDescription.Metallic;
    #endif

    SurfaceData surface = (SurfaceData)0;
    surface.albedo = surfaceDescription.BaseColor;
    surface.metallic = saturate(metallic);
    surface.specular = specular;
    surface.smoothness = saturate(surfaceDescription.Smoothness),
    surface.occlusion = surfaceDescription.Occlusion,
    surface.emission = surfaceDescription.Emission,
    surface.alpha = saturate(alpha);
    surface.clearCoatMask = 0;
    surface.clearCoatSmoothness = 1;

    #ifdef _CLEARCOAT
        surface.clearCoatMask       = saturate(surfaceDescription.CoatMask);
        surface.clearCoatSmoothness = saturate(surfaceDescription.CoatSmoothness);
    #endif

    half4 color = UniversalFragmentCustom(inputData, surface);

    color.rgb = MixFog(color.rgb, inputData.fogCoord);
    return color;
}
I know this isn’t a great code viewer, and this code is tough to read. Hopefully, you grab the complete version from the Github project linked at the bottom. The great news is now you have total control over ShaderGraph’s URP forward pass! You can do anything you want with it. Let’s make one teensy change to get that toon look from the header image.
half3 LightingCustom(BRDFData brdfData, BRDFData brdfDataClearCoat,
half3 lightColor, half3 lightDirectionWS, half lightAttenuation,
half3 normalWS, half3 viewDirectionWS,
half clearCoatMask, bool specularHighlightsOff)
{
half NdotL = step(0.5, saturate(dot(normalWS, lightDirectionWS)));
.
.
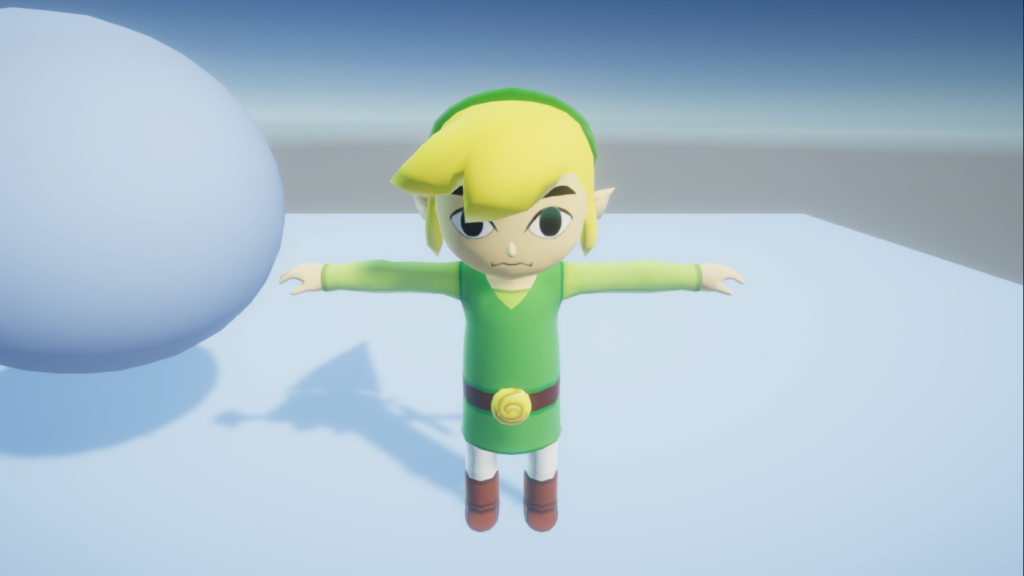
.Voila! By stepping the NdotL calculation, we give our shadows a sharp cutoff, which is the basis of the cel-shaded look. It sucks how much effort it takes to apply this tiny change.
Standard PBR Lighting 
Stepped Lighting
Next, let’s see how we can improve this manual workflow.
Improved workflow
Let me start by saying I’m still working towards a great solution. However, I’ll share my progress so far.The Shader Graph importer has an option to copy the generated shader into your system’s copy/paste buffer. Since we can access the copy/paste buffer as well, we can search and replace every instance of #include "Packages/com.unity.render-pipelines.universal/Editor/ShaderGraph/Includes/PBRForwardPass.hlsl" with CustomForwardPass.hlsl. Since this is still a manual process, consider it the first step. Let’s write a tool to do that.
using System;
using System.IO;
using System.Linq;
using System.Reflection;
using UnityEditor;
using UnityEngine;

public class ShaderGraphConversionTool : Editor
{
    const string PBRForwardPassInclude =
        "#include \"Packages/com.unity.render-pipelines.universal/Editor/ShaderGraph/Includes/PBRForwardPass.hlsl\"";

    const string CustomInclude = "#include \"CustomForwardPass.hlsl\"";

    [MenuItem("Tools/Convert Shader in CopyPaste Buffer")]
    static void ConvertShaderInBuffer()
    {
        var shader = GUIUtility.systemCopyBuffer;
        var convertedShader = ConvertShader(shader);
        GUIUtility.systemCopyBuffer = convertedShader;
        WriteShaderToFile(convertedShader, "ConvertedShader");
    }

    static string ConvertShader(string shader)
    {
        return shader.Replace(PBRForwardPassInclude, CustomInclude);
    }

    static void WriteShaderToFile(string shader, string defaultFileName)
    {
        var filePath = EditorUtility.SaveFilePanelInProject("Converted Shader", defaultFileName, "shader",
            "Where should we save the converted shader?");

        if (!string.IsNullOrEmpty(filePath))
        {
            File.WriteAllText(filePath, shader);
            AssetDatabase.Refresh();
        }
    }
}
This little tool is available from the Tools menu in your Unity project. It replaces all instances defined by PBRForwardPassInclude with the string defined by CustomInclude inside your system’s copy buffer. Then, it’ll ask you where to save the newly processed shader file. By the way, don’t forget that the converted shader must reside in the same folder as the CustomForwardPass.hlsl file. So, to use the tool, select any Shader Graph asset in your project. Then, in the Inspector, find the Copy Shader button. Press that to copy the generated shader into your system’s copy buffer. Then select Tools > Convert Shader in CopyPaste Buffer to execute the conversion. Great! It’s still a terrible workflow, but now there are slightly fewer steps!
There’s a version that will semi-reliably convert your Shader Graph every time you save it in the GitHub project at the end. It uses an asset processor to detect a change in Shader Graph files, and then through Reflection, it converts the Shader Graph to its text format for processing. It also uses a ScriptableSingleton to track where to save each converted Shader Graph shader, so the file dialogue will only pop up after the first save. Giving an in-depth explanation is enough content for an entire post, so I’ll save that for another time.
Wrap-Up
So, in this post, we saw how to take control of the so-called “backend” of Shader Graph. In other words, where Shader Graph stops, we take over. Doing so still requires some proficiency with handwritten shaders, but artists can experiment to their heart’s content through Shader Graph once the backend is written.
Check out the project here on GitHub. Check out part 2 here. If you want to support my work, join my mailing list. If you do, I’ll notify you whenever I write a new post.
TIM
wow, nice work! Thank you so much!