Scene Selector Tool
bronson
- posted on
- 13 Comments
In this article, we’ll build a custom editor window to streamline scene navigation in our project. Along the way, we’ll learn about custom menu items and the ScriptableSingleton class and some other editor scripting goodies.
What are we building?
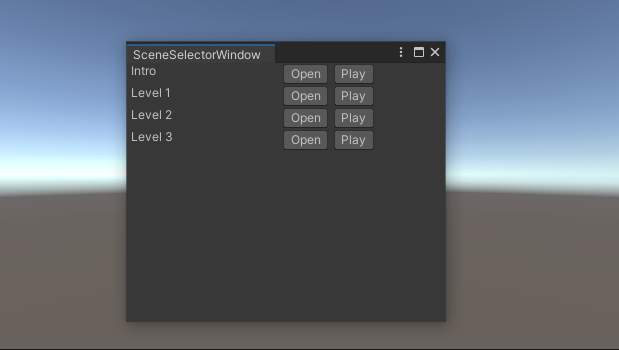
We’ll build an editor window to simplify jumping between scenes in our project. I want the window to present all the scenes in the project with a button to open them. Additionally, I want the option to jump directly into play mode after opening the scene. Finally, if I jump directly into play mode, I want to return to the scene I was in previously when I exit play mode. Admittedly this is a relatively simple editor window, but I designed it to showcase specific handy editor scripting features.
Creating an Editor Window
Starting a new editor window is as simple as creating a class that derives from EditorWindow. By the way, any editor scripts should reside in a folder called “Editor”, or you won’t be able to build your project.
public class SceneSelectorWindow : EditorWindow
{
}
However, by default, there’s no way to open your new window. It’s comforting to know that conceptually the window exists, but let’s add a MenuItem to open it.
public class SceneSelectorWindow : EditorWindow
{
    [MenuItem("Tools/Scene Selector %#o")]
    static void OpenWindow()
    {
        GetWindow<SceneSelectorWindow>();
    }
}
When you place the MenuItem attribute above a method, you can call it from the menu at the top of the editor. In this case, I created a new Tools menu and added Scene Selector to it. The attribute also supports adding keyboard shortcuts to your menu items. In my example, % represents Ctrl (Windows) or Command (macOS), # is Shift and o is, well, the letter o. Then, we use GetWindow, which either focuses on an existing SceneSelectorWindow or creates a new one if necessary.
MenuItem is a mighty tool in your editor scripting toolbox. By that, I mean you can attach any keyboard shortcut to any arbitrary method, allowing you to script or automate any editor feature. For example, you could create a shortcut to enter play mode from a specific scene. Another example from my own experience is testing in-game functionality before building in-game UI, such as saving and loading. You could add any number of helpful debug commands. One last note, any menu items you add will appear in the editor’s shortcut manager window. That means that you can remap your custom menu items without explicitly defining a shortcut in the code.
Creating the UI
Now that we have a blank window, it’s time to create the UI. We’ll build the UI using UI Toolkit, using the CreateGUI method to implement it. CreateGUI is a method that runs automatically when the root VisualElement is ready to be populated. Let’s find all the scenes in our project and create an open button for each one. To find all the scenes, we’ll use AssetDatabase.FindAssets with a filter. This method will return a list of GUIDs that we can convert into asset paths, which we need to open a scene.
void CreateGUI()
{
    var sceneGuids = AssetDatabase.FindAssets("t:Scene");

    foreach (var sceneGuid in sceneGuids)
    {
        rootVisualElement.Add(CreateSceneButton(sceneGuid));
    }
}

VisualElement CreateSceneButton(string sceneGuid)
{
    var scenePath = AssetDatabase.GUIDToAssetPath(sceneGuid);
    var buttonGroup = new VisualElement();
    buttonGroup.style.flexDirection = FlexDirection.Row;
    buttonGroup.style.marginLeft = 3;

    var sceneAsset = AssetDatabase.LoadAssetAtPath(scenePath, typeof(SceneAsset));
    var label = new Label($"{sceneAsset.name}");
    label.style.width = 150;
    buttonGroup.Add(label);

    var openButton = new Button(() => { EditorSceneManager.OpenScene(scenePath, OpenSceneMode.Single); });
    openButton.text = "Open";
    buttonGroup.Add(openButton);

    return buttonGroup;
}
If it’s not clear, the CreateSceneButton method creates a horizontally laid out VisualElement. We make a label with the name of the scene and an open button next to it. Afterwards, we’ll add a second button in the same group. By the way, to make elements lay themselves out horizontally rather than vertically, set flexDirection to FlexDirection.Row.
Now that we completed the primary UI, let’s implement a button to jump directly into play mode for a given scene.
Entering and Exiting Play Mode
Jumping directly into a scene is straightforward. It only takes one extra line of code.
VisualElement CreateSceneButton(string sceneGuid)
{
    var scenePath = AssetDatabase.GUIDToAssetPath(sceneGuid);
    var buttonGroup = new VisualElement();
    buttonGroup.style.flexDirection = FlexDirection.Row;
    buttonGroup.style.marginLeft = 3;

    var sceneAsset = AssetDatabase.LoadAssetAtPath(scenePath, typeof(SceneAsset));
    var label = new Label($"{sceneAsset.name}");
    label.style.width = 150;
    buttonGroup.Add(label);

    var openButton = new Button(() => { EditorSceneManager.OpenScene(scenePath, OpenSceneMode.Single); });
    openButton.text = "Open";
    buttonGroup.Add(openButton);

    var playButton = new Button(() =>
    {
        SceneSelectorSettings.instance.PreviousScenePath = SceneManager.GetActiveScene().path;
        EditorSceneManager.OpenScene(scenePath, OpenSceneMode.Single);
        EditorApplication.EnterPlaymode();
    });
    playButton.text = "Play";
    buttonGroup.Add(playButton);
    return buttonGroup;
}
Here’s the revised version of the CreateSceneButton method. You’ll see that we turn our open button into a play button with one more line of code. But I snuck our next topic in there as well, that is, the SceneSelectorSettings. When entering play mode through our button, store the path to the scene we’re currently in inside SceneSelectorSettings. What is SceneSelectorSettings? It’s a ScriptableSingleton.
Scriptable Singletons
Scriptable Singletons are an editor class based on ScriptableObject to simplify saving settings between assembly reloads and unity editor sessions. Create one by creating a new class that derives from ScriptableSingleton. Additionally, specify a FilePath attribute, and it’ll automatically know how to save and load to disk. The FilePath attribute specifies a path relative to either the project folder or settings folder, for per-project or per-machine settings, respectively. In our case, let’s save the settings in the project folder.
using UnityEditor;

[FilePath("Assets/SceneSelectorTool/Editor/SceneSelectorSettings.asset", FilePathAttribute.Location.ProjectFolder)]
public class SceneSelectorSettings : ScriptableSingleton<SceneSelectorSettings>
{
    public string PreviousScenePath;

    void OnDestroy()
    {
        Save(true);
    }
}
Another important note is that Scriptable Singletons don’t automatically save. You have the option of saving whenever you modify a setting or do as I did, which is to save in the OnDestroy method. Our tool only has a single setting worth saving, but you can add as many fields as needed to the ScriptableSingleton in your projects.
The last feature to add is to return to the scene we were in before we pushed the play button. So let’s learn about the playModeStateChanged event.
Detecting play mode state changed
The EditorApplication class raises the event playModeStateChanged whenever the play mode changes. When I first set this up, I tried to hook into that event when the user pressed Scene Selector’s play button. However, since entering and exiting play mode causes a domain reload, I never received the event. We’ll register for the event in a method marked with the InitializeOnLoadMethod attribute to work around this. If you don’t know, adding the ‘InitializeOnLoadMethod’ attribute to a static method will ask the editor to run it after every reload. Then, in our callback, we identify when we’ve entered edit mode and open the scene stored in the SceneSelectorSettings.
[InitializeOnLoadMethod]
static void RegisterCallbacks()
{
    EditorApplication.playModeStateChanged += ReturnToPreviousScene;
}

static void ReturnToPreviousScene(PlayModeStateChange change)
{
    if (change == PlayModeStateChange.EnteredEditMode)
    {
        EditorSceneManager.OpenScene(SceneSelectorSettings.instance.PreviousScenePath, OpenSceneMode.Single);
    }
}
Here are the two files in their entirety, but the code is easier to read in the Github project linked at the end of this article.
//SceneSelectorWindow.cs
using UnityEditor;
using UnityEditor.SceneManagement;
using UnityEngine.SceneManagement;
using UnityEngine.UIElements;

public class SceneSelectorWindow : EditorWindow
{
    [MenuItem("Tools/Scene Selector %#o")]
    static void OpenWindow()
    {
        GetWindow<SceneSelectorWindow>();
    }

    [InitializeOnLoadMethod]
    static void RegisterCallbacks()
    {
        EditorApplication.playModeStateChanged += ReturnToPreviousScene;
    }

    void CreateGUI()
    {
        var sceneGuids = AssetDatabase.FindAssets("t:Scene");

        foreach (var sceneGuid in sceneGuids)
        {
            rootVisualElement.Add(CreateSceneButton(sceneGuid));
        }
    }

    static void ReturnToPreviousScene(PlayModeStateChange change)
    {
        if (change == PlayModeStateChange.EnteredEditMode)
        {
            EditorSceneManager.OpenScene(SceneSelectorSettings.instance.PreviousScenePath, OpenSceneMode.Single);
        }
    }

    VisualElement CreateSceneButton(string sceneGuid)
    {
        var scenePath = AssetDatabase.GUIDToAssetPath(sceneGuid);
        var buttonGroup = new VisualElement();
        buttonGroup.style.flexDirection = FlexDirection.Row;
        buttonGroup.style.marginLeft = 3;

        var sceneAsset = AssetDatabase.LoadAssetAtPath(scenePath, typeof(SceneAsset));
        var label = new Label($"{sceneAsset.name}");
        label.style.width = 150;
        buttonGroup.Add(label);

        var openButton = new Button(() => { EditorSceneManager.OpenScene(scenePath, OpenSceneMode.Single); });
        openButton.text = "Open";
        buttonGroup.Add(openButton);

        var playButton = new Button(() =>
        {
            SceneSelectorSettings.instance.PreviousScenePath = SceneManager.GetActiveScene().path;
            EditorSceneManager.OpenScene(scenePath, OpenSceneMode.Single);
            EditorApplication.EnterPlaymode();
        });
        playButton.text = "Play";
        buttonGroup.Add(playButton);
        return buttonGroup;
    }
}

//SceneSelectorSettings.cs
using UnityEditor;

[FilePath("Assets/SceneSelectorTool/Editor/SceneSelectorSettings.asset", FilePathAttribute.Location.ProjectFolder)]
public class SceneSelectorSettings : ScriptableSingleton<SceneSelectorSettings>
{
    public string PreviousScenePath;

    void OnDestroy()
    {
        Save(true);
    }
}
Wrap-up
We’ve covered creating editor windows, menu items with shortcuts, scriptable singletons and detecting changes in the play mode state. Hopefully, this knowledge enables you to take control of your Unity editor experience. Even simple tools can significantly improve your workflow when you tailor them to your specific needs, so I hope you’re able to implement these ideas into your projects.
Peruse the entire Github project here. If you like my work, join my mailing list to be notified when I write a new post.
Menawer Alazemi
Awesome i been looking for this, i saw a similar one on the Unity Open Project repo, but it was kinda coupled with the assets there, thanks alot.
bronson
Thanks! That’s awesome to hear! I’m happy to help 😀
Menawer
I found that adding a folder is even better if you dont want to have scenes from asset store to be included which sometimes can fill the window with unnecessary scenes
“`
var sceneGuids = AssetDatabase.FindAssets(“t:Scene”,new[] {“Assets/Scenes”});
“`
This way all scenes from “Assets/Scenes” will be included.
bronson
That’s a fantastic idea! I hadn’t thought of that. You could even split scenes into levels, playgrounds, tools, etc. And organize them in the menu by their function.
Tim
Assets\SceneSelectorTool\Editor\SceneSelectorSettings.cs(3,2): error CS0122: ‘FilePathAttribute’ is inaccessible due to its protection level
Assets\SceneSelectorTool\Editor\SceneSelectorSettings.cs(3,86): error CS0122: ‘FilePathAttribute’ is inaccessible due to its protection level
I get this error regarding the FilePathAttribute in 2019.4.11f1 LTS but it works without issue in 2020.3.0f1.
Have you had this issue or know a fix? I attempted to google but couldn’t find anything specific to path attribute being inaccesible. Tested it also on a new 2019.4.11f1 URP project and is same issue.
bronson
Shoot you’re right! It looks like this only became public in 2020 onwards. Before that it existed but it was internal. I have a trick you can use though:
1. Create a new “Assembly Definition” in the Editor folder where SceneSelectorSettings.cs resides. You can do this from Assets > Create > Assembly Definition.
2. Name that assembly definition Assembly-CSharp-Editor-testable. Now, after Unity recompiles the scripts, any scripts inside that folder will have access to internal APIs like FilePath and ScriptableSingleton.
I hope this helps! Let me know if it worked and I’ll update the post to add it as a tip.
Tim
Hi Bronson, thanks for the fast reply.
That fixed the console error message but for some reason when opening the Scene Selector Tool, the scenes and Open/Play buttons don’t show up. This was always the case though even when I commented out the PathAtrribute line in SceneSelectorSettings.
As mentioned, that was in 2019.4.11f1, and I tested on a brand new URP project directly copy and pasting both scripts.
I did however just try 2019.4.29f1 (the lastest 2019 LTS version).
The console error also appears on this version, but as before the Asmdef file fixed that, but now the SceneSelectorTool works as expected. Not sure why.
bronson
It’s weird that the Open/Play buttons didn’t show up in that first version. It sounds like something was silently preventing Unity from recompiling and then when you updated the Unity version it forced a recompile and fixed it. Of course that’s just a guess, there’s no way to really know at this point. I’m glad it works in the end though!
Sef
Hi Bronson. I recently found your blog and I’m loving reading through your posts.
I found this one especially interesting since I have a very similar scene window that I wrote years ago and now can’t live without.
I have a suggestion that might simplify your code somewhat. There’s a little known feature in the Editor Scene Manaher that lets you specify which scene will be loaded when the editor enters play mode. Exiting play mode restores your original loaded scenes, and even keeps unsaved changes.
https://docs.unity3d.com/ScriptReference/SceneManagement.EditorSceneManager-playModeStartScene.html
bronson
Thanks! I didn’t know about that one 😀
Lucas
Just use quick scenes. I have made that for free.
bronson
Yes, there are several tools that solve this particular problem. However, the purpose of this blog is to teach folks how to think about and solve their own project-specific issues. The true value of this post is to demonstrate the techniques to build editor tools, not the window itself.
Kostasmik
Awsome tool! Saves a lot of headache